NSX Application Platform (NAPP) Deployment using Automation Appliance
In this post, I will provide an overview of the VMware NSX Application Platform (NAPP), explaining why it is essential for deployment in our environment. I’ll also discuss the prerequisites for NAPP and guide you through the deployment process using the NAPP automation appliance.
Overview
Starting with NSX version 3.2, VMware had introduced NSX Application Platform which is a modern microservices platform that hosts the following NSX Advanced Threat Prevention (ATP) security features:
- VMware NSX Intelligence
- VMware NSX Network Detection and Response
- VMware NSX Malware Prevention
- VMware NSX Metrics
There are two methods for deploying NAPP: manual and automated. In this post, we will cover the automated deployment using the NAPP Automation Appliance.
NAPP Automation Appliance will automatically deploy the below:
- HA proxy
- TKGs cluster
- NSX Application Platform
NSX Application Platform Prerequisites
Before installing the NSX Application Platform, we must make sure that our environment meets the below prerequisites.
- NSX Version
To ascertain the compatibility between NSX versions and the corresponding NSX Application Platform versions available for deployment, refer to the provided compatibility matrix.
| NSX Version | Compatible NSX Application Platform version |
| 3.2.x | 3.2.0, 3.2.1, 4.0.1, 4.1.1 |
| 4.0.0.1 | 3.2.1, 4.0.1, 4.1.1 |
| 4.0.1, 4.1.0 | 4.0.1, 4.1.1 |
| 4.1.1, 4.1.2 | 4.1.1 |
- NSX License
To initiate the deployment of the NSX Application Platform, ensure that the active NSX Manager has a valid license throughout the NSX Application Platform deployment process.
Refer to the “License Requirement for NSX Application Platform Deployment” documentation for a comprehensive list of valid licenses. - NSX User
NSX user must have Enterprise Admin role privileges. - NSX Certificate
NSX NAPP can be deployed even when the NSX Manager nodes are using the default self-signed certificates, however, if your NSX Manager nodes uses CA-signed certificates with partial chain on the NSX Manager Unified Appliance cluster, you must replace the certificate with a full certificate chain. - Kubernetes Cluster Resources
VMware endorses the deployment of NSX Application Platform on a Tanzu Kubernetes Grid (TKG) Cluster or an Upstream Kubernetes cluster.
The following versions have been thoroughly tested and are officially supported by VMware.
| NSX Application Platform version | TKG Cluster on Supervisor version | Upstream Kubernetes cluster version |
| 3.2.0, 3.2.1 | 1.17 – 1.21 | 1.17 – 1.21 |
| 4.0.1 | 1.20 – 1.22 | 1.20 – 1.24 |
| 4.1.1 | 1.21 – 1.24 | 1.21 – 1.24 |
Be aware that when utilizing the Automation Appliance for NSX NAPP deployment, it will automatically deploy the Tanzu Kubernetes Grid (TKG) cluster, and it is crucial to allocate sufficient resources to the Kubernetes cluster for deploying NSX Application Platform pods.
As each supported NSX feature has distinct resource prerequisites, refer to the “NSX Application Platform System Requirements” to identify the specific NSX feature you intend to use.
- Internet Access
Ensure that your NSX system can access the public VMware-hosted registry and repository where you can obtain the packaged NSX Application Platform Helm chart and Docker images. Direct Internet access is only required during the installation and upgrade operations.
This access is limited to the outbound access on TCP Port 443 (HTTPS) to: “oci://projects.registry.vmware.com/nsx_application_platform/helm-charts” and “projects.registry.vmware.com/nsx_application_platform/clustering“.
Note:
OCI is supported on NSX versions 3.2.3.1 or 4.0.1+, so if you have NSX below 3.2.3.1 then you must update to a supported version. - IP addresses and DNS Records
Before Automation Appliance and NAPP installation, you must plan for the IP address allocations and create the required DNS records.
NAPP IPAM Planner and Lab Topology
Three different networks (management, frontend, and workload) are required to deploy NAPP using the automation appliance.
Management network: 192.168.10.0/24
Frontend network: 192.168.20.0/24
Workload network: 192.168.30.0/24
| Component | Network Name | IP Addresses | DNS Records |
| Automation Appliance Management IP | Management | 192.168.10.100 | automation-appliance.mm.local |
| HA Proxy Management IP | Management | 192.168.10.30 | |
| HA Proxy Frontend IP | Frontend | 192.168.20.2 | |
| HA Proxy Workload IP | Workload | 192.168.30.2 | |
| Load Balancer VIP Range | Frontend | 192.168.20.16/28 | |
| Service Name | Frontend | 192.168.20.19 | napp.mm.local |
| Messaging Name | Frontend | 192.168.20.20 | napp-messaging.mm.local |
| Supervisor Management First IP | Management | 192.168.10.31 | |
| Supervisor Workload First IP | Workload | 192.168.30.31 |
Deploying NAPP Automation Appliance OVA
- Download the NSX NAPP Automation Appliance ova using the below link.
https://via.vmw.com/napp-automation-ova - As a standard virtual appliance based on Photon OS, deploying the appliance is straightforward. From the vCenter server UI, upload the downloaded ova to a content library, and click on New VM from This Template.

- Provide a Virtual machine name, select a Compute resource and Target datastore, and select the destination Portgroup.
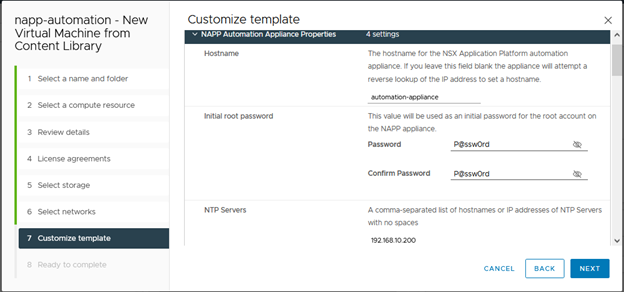
- Under the Customize template page, enter the Hostname for the NSX NAPP Automation Appliance and the provide Initial root password and the NTP servers.
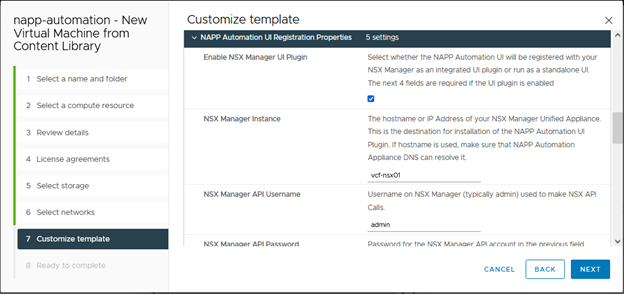
- On the same page, click on Enable NSX Manager UI plugin, and provide the required details (hostname, username, password) for your NSX Manager.
- Change the Network Mode to Static and provide the IP Address, Network Prefix, Gateway, Domain Name, Domain Search Path, and Domain Name Servers.
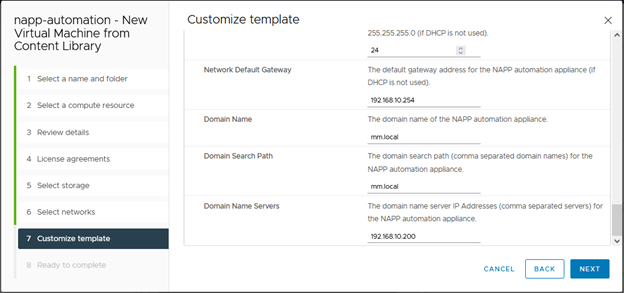
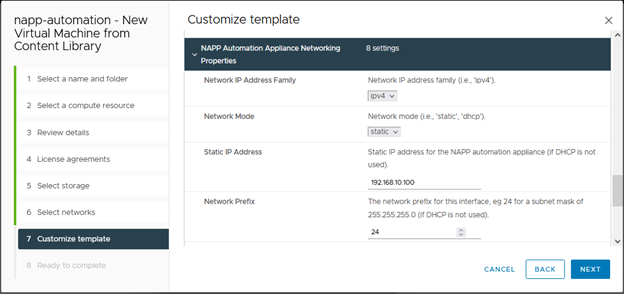
- Click finish to start the deployment process.
Once this task is completed, power on the NSX NAPP Automation Appliance virtual machine. - Once this initialization process is completed, access the NAPP Automation UI either NSX Manager or via the browser using https.

Deploying NSX Application Platform (NAPP)
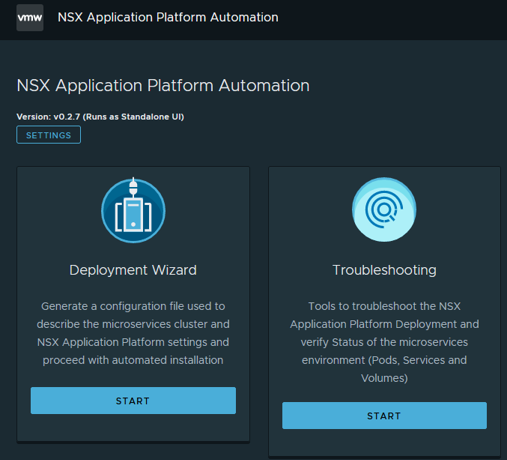
- Navigate to the NAPP Automation UI and click Start under the Deployment Wizard.
- Enter the vCenter Server hostname, Username, and Password.
Click Connect.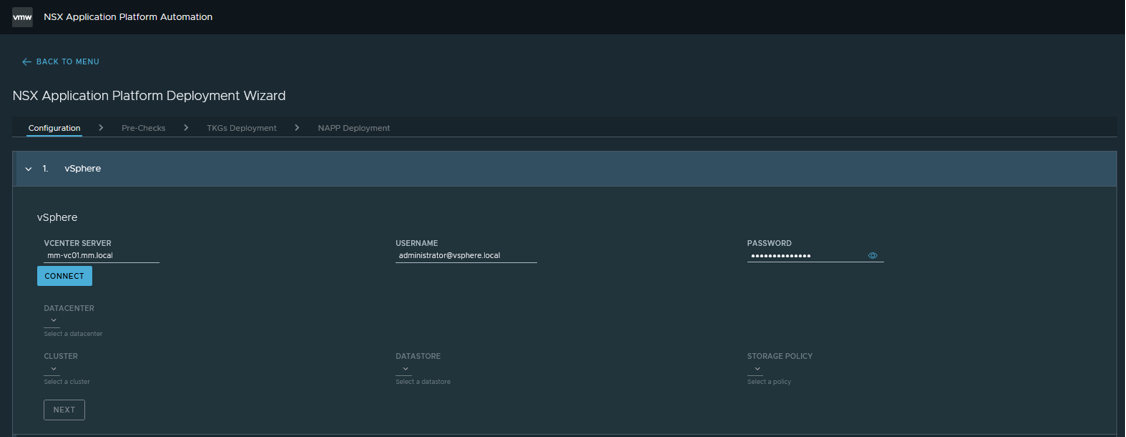
- Once you have successfully authenticated the vCenter Server, select the Datacenter, Cluster, Datastore, Storage policy and then click NEXT.

- Under the Networking tab, provide all the mandatory parameters as outlined in the NAPP IPAM Planner and Lab Topology. Click Next to continue.
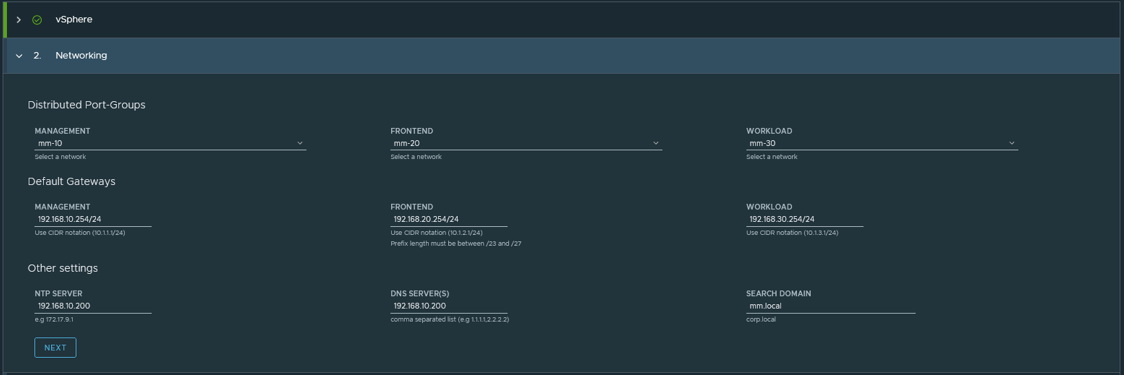
- Enter the load balancing parameters and click Next.
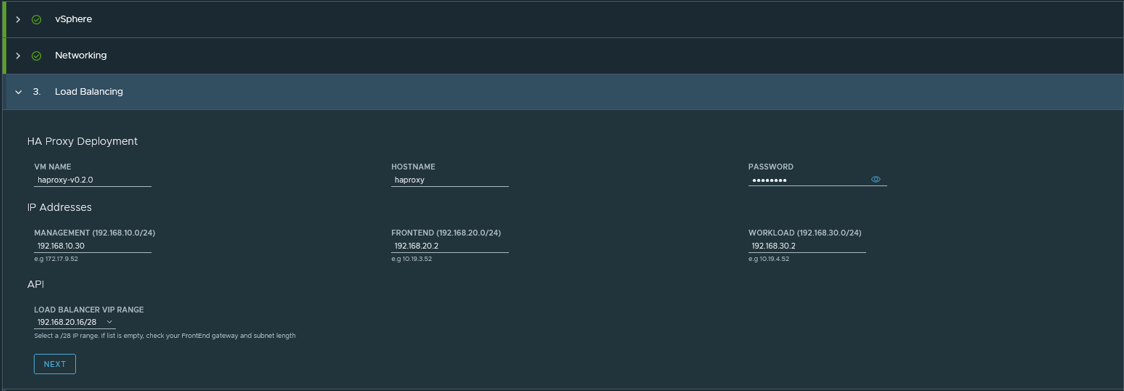
- Provide Tanzu resources parameters and click Next.

- Enter your NSX FQDN, Username, and Password and click Next.

- Choose the NAPP Version you want to deploy. Provide all the mandatory parameters and then click Submit to move to the Pre-checks step.
NAPP 4.0.1 was the latest version when it was deployed in my lab.
Note: The Helm Repository I used in the below screenshot is not supported anymore, and you must use: “oci://projects.registry.vmware.com/nsx_application_platform/helm-charts“.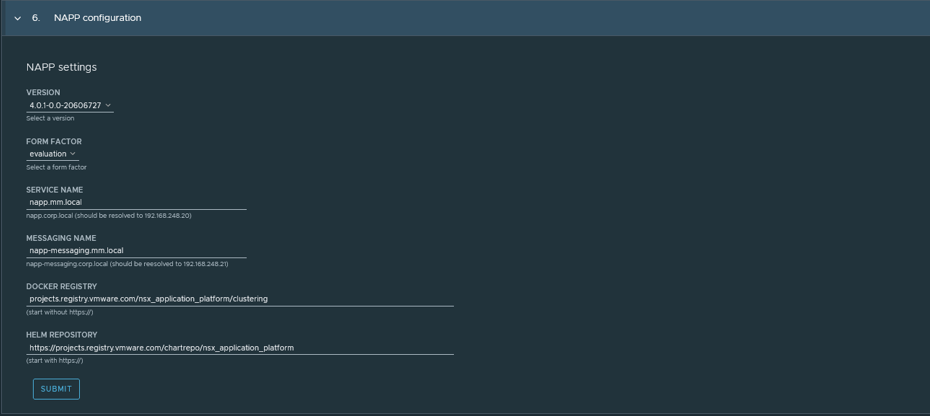
- Click Start Pre-Checks for the NAPP Automation UI to validate the environment before proceeding with TKGs and NAPP Deployment:

- If the status of the Pre-checks is successful, click Next and the TKGs and NAPP deployment will be fully automated.

- Click Start TKGs Deployment.
You can download the Kubeconfig file after s successfully deployment.

- Click Start NAPP Deployment and the NAPP will be deployed.

- Once the deployment is completed, from your NSX UI navigate to System->NSX Application Platform and verify that the NAPP deployment was successful.


Congratulations! You’ve successfully deployed NSX Application Platform using the Automation Appliance.
![]()
